
how to load a grease gun with cartridge comes down to three things: matching the right cartridge to your gun, priming out air, and keeping the grease path clean so it actually pumps instead of sputtering.
If you’ve ever pulled the trigger and got nothing, or watched grease ooze from the wrong place, you already know why this matters, wasted time is one thing, but dry bearings and blown seals get expensive fast.
I’ll walk you through a cartridge load that works for most common lever and pistol-grip grease guns in the U.S., plus quick checks when the gun won’t prime, and a few “don’t do this” mistakes that cause most of the mess.
Before you start: what you need and what to check
Most “my grease gun won’t work” stories start before the cartridge even goes in, usually a mismatch or a dirty coupler. Take 60 seconds to sanity-check these items.
- Correct cartridge size: many U.S. cartridges are 14 oz (standard). Confirm your gun supports that size.
- Grease type: NLGI grade and thickener type should match your equipment needs, mixing incompatible greases can cause separation or poor flow.
- Clean coupler and zerk: wipe both, grit in the coupler can push contamination into a bearing.
- Plunger rod moves freely: if it’s sticky or bent, priming becomes a fight.
According to NLGI (National Lubricating Grease Institute), grease selection and handling affect performance and component life, so keeping cartridges clean and correctly matched is not just “shop neatness,” it’s reliability.
Grease gun styles and why loading feels different
Cartridge loading is broadly similar across guns, but the priming step changes a bit depending on the design, especially where the bleed valve sits and how strong the spring pressure feels.
| Grease gun type | What you’ll notice | What to watch |
|---|---|---|
| Lever-action | High output per stroke, common in shops | Air pockets show up as “dead strokes” |
| Pistol-grip | Easier one-handed pumping | Often needs careful priming after cartridge change |
| Cordless/battery | Fast, consistent pressure | Over-pressurizing seals is easier, go slow on first use |
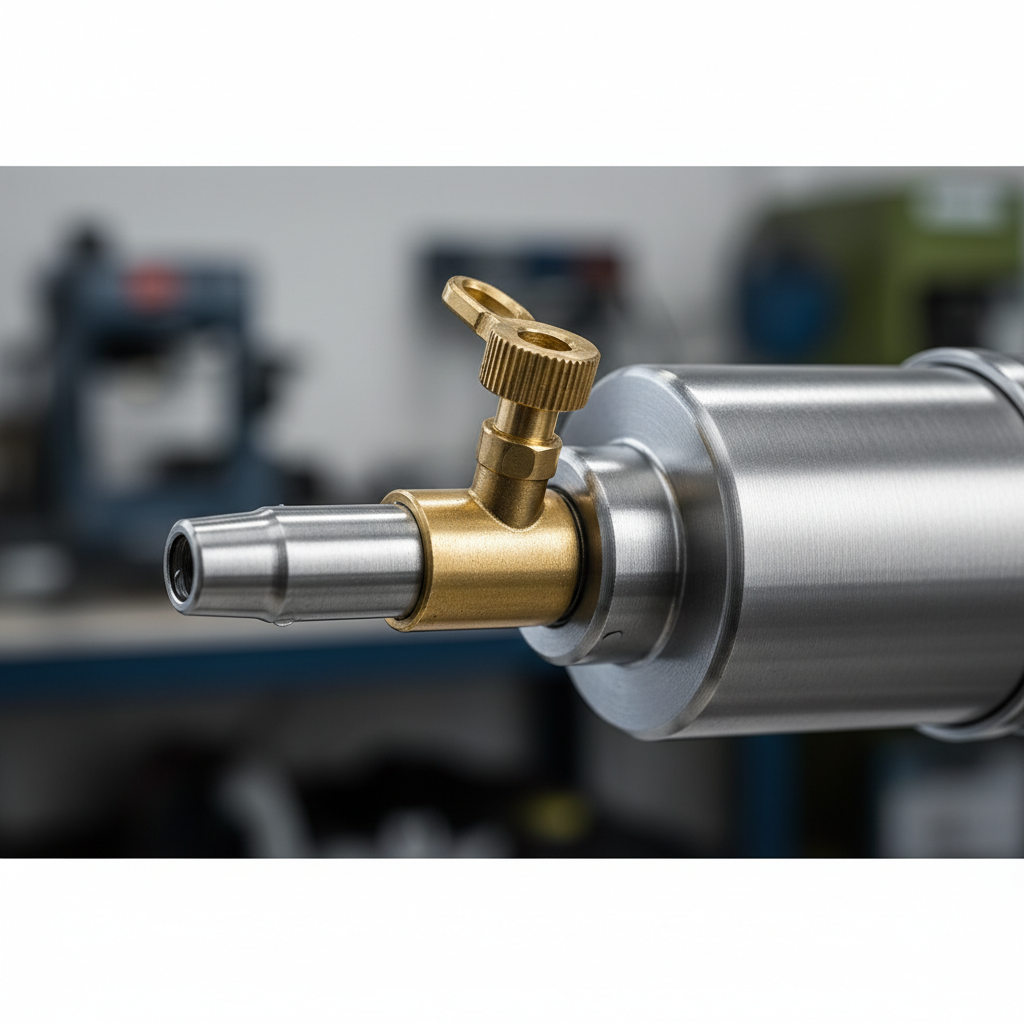
If your gun has a bleeder valve (a small screw/button near the head), life gets easier, because you can purge air without taking anything apart.
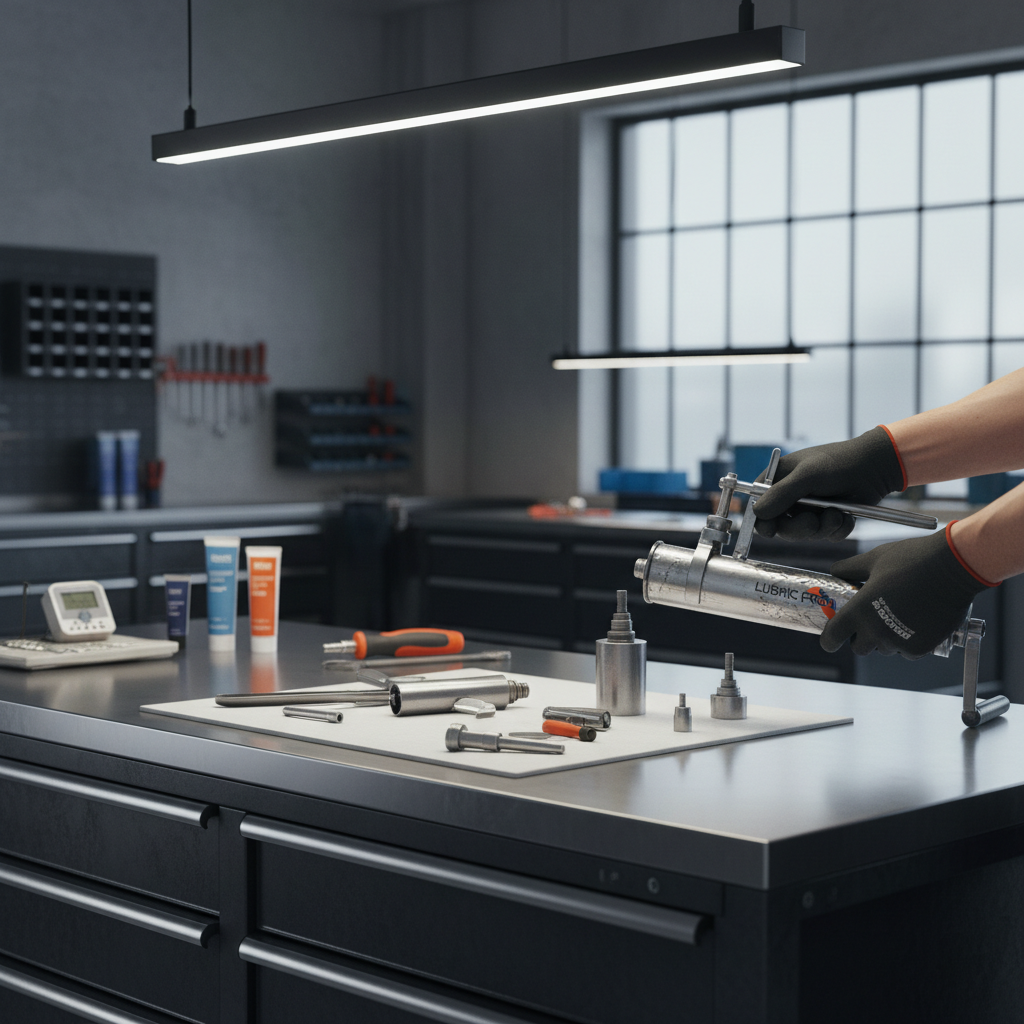
Step-by-step: how to load a grease gun with cartridge (clean method)
This is the method that minimizes mess and reduces the chance of trapping air. If your brand’s manual differs, follow the manual, but these steps match most mainstream guns.
1) Retract and lock the plunger rod
Pull the plunger rod all the way out until it locks, usually with a notch or twist-lock. You’re creating space for the new cartridge and relieving pressure.
2) Unscrew the barrel from the head
Hold the head steady and turn the barrel counterclockwise. Keep it upright if possible, old grease often sits at the head end and wants to drool out when tilted.
3) Insert the new cartridge (cap end first)
Drop the cartridge into the barrel with the plastic cap end going toward the head. Then remove the plastic cap.
- If the cartridge has a pull-tab seal on the other end, leave it on for now.
- If the cartridge has a metal pull-off lid, remove it only when you’re ready to seat the barrel.
4) Reattach the barrel to the head, then remove the seal
Screw the barrel back into the head a few turns, then remove the cartridge’s pull-tab seal, and finish tightening. This sequence helps reduce air entry at the head.
5) Release the plunger rod slowly
Unlock the plunger rod and let it move forward under spring pressure. Don’t let it slam, a controlled release helps the follower seat against the cartridge and pushes grease toward the pump.
6) Prime the gun (purge air)
Now pump until grease flows steadily. If your gun has a bleeder valve, crack it open slightly while pumping until grease (not air) appears, then close it.
Key point: consistent flow matters more than “how many pumps.” Some setups prime in 5 strokes, others take 30 depending on viscosity and temperature.
Quick self-check: why your grease gun won’t prime after loading
If you followed the steps and still get nothing, you’re usually dealing with air lock, a stuck follower, or a blocked path. This checklist narrows it down fast.
- No resistance on the lever/trigger: likely air lock or plunger not engaged on the cartridge.
- High resistance but no grease out: coupler blockage, hardened grease in the head, or zerk fitting plugged.
- Grease leaks at barrel threads: barrel not fully seated, damaged gasket/O-ring, or cross-threading.
- It worked, then stopped: follower stuck on cartridge seam, or the cartridge seal did not fully remove.
According to OSHA, controlling hazards includes maintaining tools and using PPE when handling lubricants and pressurized equipment, so if you see cracked parts or persistent leakage, pause and fix the tool instead of muscling through.

Troubleshooting fixes that usually work (by symptom)
Here are practical fixes that solve most “dead gun” scenarios without turning it into a full teardown.
Air lock (most common)
- Open the bleeder valve (if equipped) and pump until grease appears, then close.
- No bleeder valve: slightly loosen the head-to-barrel connection one turn, pump until grease seeps, then retighten.
- Tap the barrel lightly with a rubber mallet to help trapped air rise, especially in cold weather.
Plunger/follower not pushing grease
- Confirm the plunger rod is fully released and spring pressure is applied.
- Pull the rod back, relock, and release again slowly to re-seat the follower.
Coupler won’t pass grease into the fitting
- Clean the coupler jaws, then try again with the coupler straight on the zerk.
- Test the gun by pumping into a rag without the coupler attached, if grease flows, your blockage is downstream.
- If the zerk seems plugged, replacement is often faster than fighting it, but equipment-specific advice may vary.
Practical tips to keep loading clean and consistent
These are the small habits that make cartridge changes feel boring, which is exactly what you want.
- Warm cartridges in winter: cold grease moves slowly, priming feels “broken” even when it’s not.
- Keep spare caps and rags nearby: most mess happens when you’re walking around looking for them.
- Don’t mix grease types casually: if you must switch, clean out the gun, incompatibility can cause odd texture and poor lubrication.
- Label the gun: one gun per grease type prevents accidental mixing in shared shops.
Key takeaways: lock the plunger rod, seat the cartridge correctly, release pressure slowly, then purge air until flow becomes steady.
Safety notes and when to get help
Grease guns seem harmless, but pressure can be high enough to cause injury if misused, and some lubricants can irritate skin. If anything feels off, it’s fine to be cautious.
- Wear gloves and eye protection when priming, especially when cracking a bleeder valve.
- Never point a coupler at skin, injection injuries are rare but serious, and typically require immediate medical evaluation.
- If the gun repeatedly blows seals, leaks at the head, or requires constant loosening to prime, consider replacing O-rings or having a technician inspect the unit.
According to CDC guidance on high-pressure injection injuries, quick evaluation is recommended in many situations, so if grease contacts skin under pressure, seek professional medical advice promptly.
Conclusion: a cartridge load that saves time every week
Once you know how to load a grease gun with cartridge the right way, the “mystery failures” usually disappear, most of them are just air trapped where grease should be. Next time, do the slow plunger release and purge air on purpose, then confirm a steady stream before you walk back to the machine.
If you want an easy routine, keep one checklist: wipe the coupler, lock rod, insert cartridge, release slowly, bleed air, test flow, then grease your fittings with controlled pressure.
If you’re maintaining a fleet or running a shop where multiple people share tools, it may be worth standardizing cartridges and labeling grease guns by grease type, it prevents a lot of quiet mistakes.